
Your own DIY weather station is very useful if you for example want to optimize the growing process of your plants.
It gives you the possibility of getting real-time data or statistics about things the soil moistness, or the temperature around your plants.
In this tutorial, I will show you how to build your own DIY weather station using the Intel Galileo and a few sensors.
You’ll learn how to install a web server on your Intel Galileo and how to customize it into showing all the sensor measurements you want to have available.
You can get the Intel Galileo from Amazon.
To follow this tutorial, you need to have your Intel Galileo running Linux from an SD-card. And you need either a WiFi card installed, or an ethernet cable to connect to a router.
In addition, you need the following components:
- Breadboard and jumper wires
- Grove Soil Sensor
- Rain Sensor
- Temperature sensor DHT11

Step 1: Connect Intel Galileo to a network
Connect your Intel Galileo to a router with Internet access via WiFi or ethernet cable. Connect your computer to the same network.
Now you need to find the IP address of your Galileo. You can do this by logging into the router’s admin page and check the list of connected devices. More ideas on finding the IP of your Intel Galileo here: IntelAcademic_IoT_03_Networking.pdf
My Galileo got the IP address 192.168.0.100
Step 2: Get up and running with SSH
Next, to be able to configure your DIY weather station, log in with SSH from the terminal like this (if using Linux or Mac):
ssh root@192.168.0.100
If you don’t know how to use SSH, check out one of these links:
- Windows: https://mediatemple.net/community/products/dv/204404604/using-ssh-in-putty-
- Mac: http://apple.blogoverflow.com/2012/02/how-to-use-ssh-on-mac-os-x/
- Linux: https://chrisjean.com/ssh-tutorial-for-ubuntu-linux/
Step 3: “Hello World!” from the web server
Next, you’re going to install a web server that will display the sensor values on a web page. This will be the heart of your DIY weather station.
To do this, you’re going to start by setting up a simple “Hello World” web server using Node.js as explained in one of Intel’s IoT lessons.
First, create an empty file called ‘hello.js’. Use ‘vi’ or another editor to add the code below into the file ‘hello.js’. Replace X.X.X.X with the IP address of your Galileo:
‘Vi’ can be confusing for first-timers. Here’s a quick guide:
http://www.astrohandbook.com/ch20/vi_guide.html
var http = require('http');

http.createServer(
    function (req, res) {
        res.writeHead(200,{'Content-Type': 'text/plain'});
        res.end('Hello Worldn');
    }
).listen(1337, ‘X.X.X.X');

console.log(‘Server running at http://X.X.X.X:1337/');
Then launch the web server by typing the command on your Galileo (through ssh):
node hello.js
After a couple of seconds, you should see the message:
‘Server running at http://X.X.X.X:1337/’
Then test your server from a PC on the same network, by opening a browser window with the address http://X.X.X.X:1337 (Exchange X.X.X.X with the IP of your Galileo)
You should see the text “Hello World”:

Step 4: Display data from a file
Now, you want to display data from a file instead. This way, you can later create a program that writes sensor data to this file.
First, create a sample file ‘sensor-data.txt’, with the following content:
****************************
Temperature: 99
Air Humidity: 88
Soil Humidity: 77
Rain: 66
****************************
Then, create a new file ‘sensor-webserver.js’ with the following code, and replace X.X.X.X with your Galileo’s IP-address:
// Code from https://docs.nodejitsu.com/articles/HTTP/servers/how-to-serve-static-files

var http = require('http');
var fs = require("fs");
var fileName = "/home/root/webserver/sensor-data.txt";

http.createServer(function (req, res) {
    fs.readFile(fileName, function (err,data) {
        if (err) {
            res.writeHead(404);
            res.end(JSON.stringify(err));
            return;
        }
    res.writeHead(200);
    res.end(data);
    });
}).listen(1337, ‘X.X.X.X');

console.log(‘Server running at http://X.X.X.X:1337/');
You should see the sample data you entered into the text-file:

Now it’s starting to look like a proper DIY weather station!
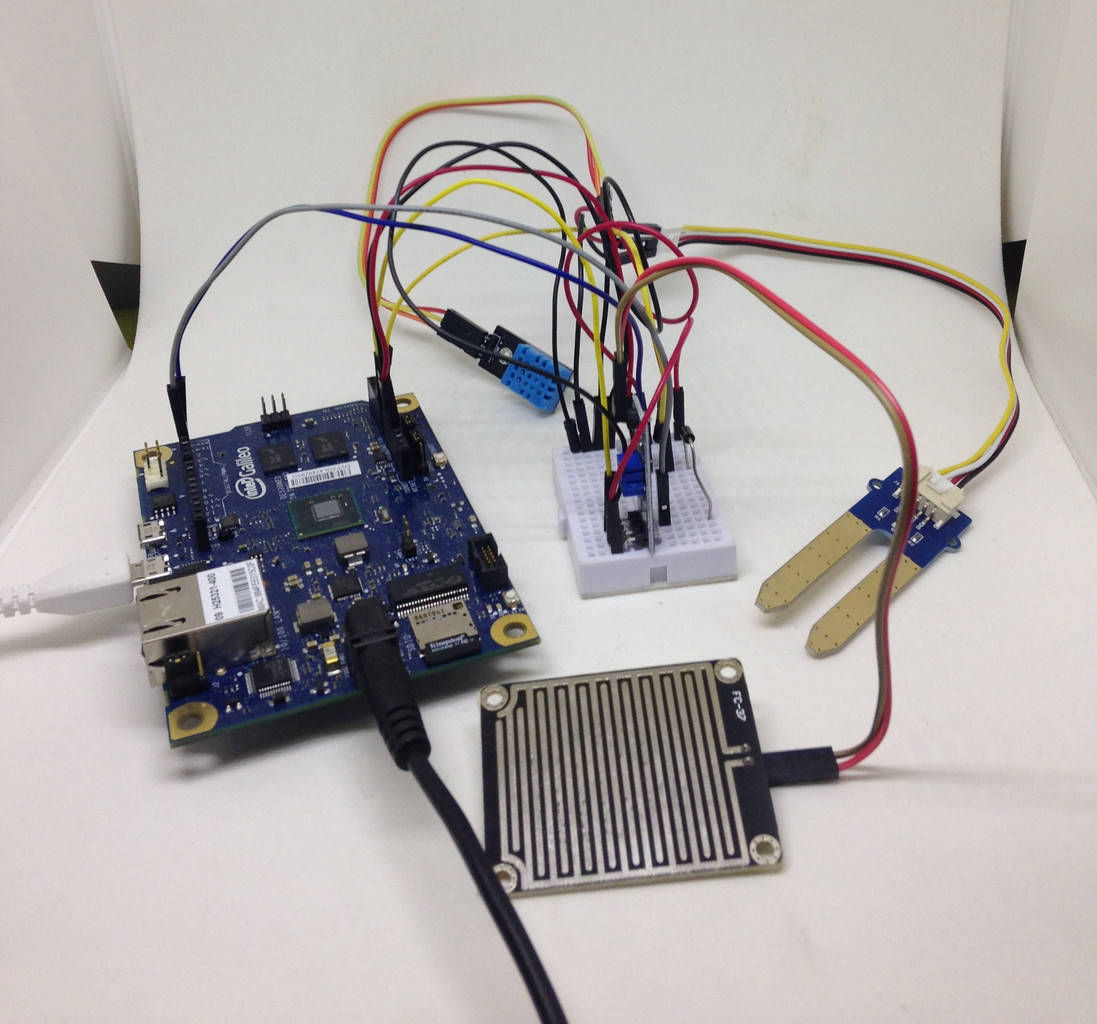
Step 5: Connect the sensors for your DIY weather station
Connect your sensors to your Intel Galileo board. If you are unsure how, check out these tutorials:
Step 6: Write sensor values to file
It wouldn’t be a DIY weather station without any sensors that can sense the weather.
So, now it’s time to get real sensor data onto your web server. Since you already are showing data from a file in your web server, all you need to do is to write your sensor data to that file.
Upload the following code to your Intel Galileo:
#include "DHT.h"

#define DHTIN 2
#define DHTOUT 3
#define DHTTYPE DHT11 // DHT 11
DHT dht(DHTIN,DHTOUT, DHTTYPE);

//Define pins for the rain and soil sensors:

int sensorPinSoil = A0; // seleccionar el pin de entrada para el sensor de suelo
int sensorPinRain = A1; // seleccionar el pin de entrada para el sensor de lluvia

//Filename to write to
String fileName = "/home/root/webserver/sensor-data.txt";

void setup() {
    Serial.begin(9600);

    //Initialize the sensor
    dht.begin();
}

void loop() {

    String toBeWritten;
    char charBuf[1024];
    float humidity_value = 9999.0;
    float temperature_value = 9999.0;
    float soil_humidity_value = 9999.0;
    float rain_value = 9999.0;

    // Reading temperature or humidity takes about 250 milliseconds!
    // Sensor readings may also be up to 2 seconds 'old' (its a very slow sensor)
    humidity_value = dht.readHumidity();
    // Read temperature as Celsius
    temperature_value = dht.readTemperature();

    // Check if any reads failed and exit early (to try again).
    if (isnan(humidity_value) || isnan(temperature_value)) {
        Serial.println("Failed to read from DHT sensor!");
        humidity_value = 9999.0;
        temperature_value = 9999.0;
    }

    // leer los valores de los sensores:
    soil_humidity_value = analogRead(sensorPinSoil);
    rain_value = analogRead(sensorPinRain);

    Serial.println("nSensor readings:n");
    Serial.print("Humidity: ");
    Serial.print(humidity_value);
    Serial.print(" %t");
    Serial.print("Temperature: ");
    Serial.print(temperature_value);
    Serial.println(" *C ");
    Serial.println("Logging readings to file...nn");

    // Need to build a string that is to be written to file

    toBeWritten = "'****************************";
    toBeWritten.concat("n");
    toBeWritten.concat("n Temperature (Celsius): ");
    toBeWritten.concat((int)temperature_value);
    toBeWritten.concat("n Humidity: ");
    toBeWritten.concat((int)humidity_value);
    toBeWritten.concat("n Rain: ");
    toBeWritten.concat((int)rain_value);
    toBeWritten.concat("n Soil Humidity: ");
    toBeWritten.concat((int)soil_humidity_value);
    toBeWritten.concat("n ");
    toBeWritten.concat("n****************************");
    toBeWritten.concat("n");

    // Adding commands to execute on the linux system
    // echo '........' > /home/root/webserver/sensor-data.txt

    String command = "echo ";
    command.concat(toBeWritten);
    command.concat("' > ");
    command.concat(fileName);
    command.toCharArray(charBuf, 500);
    Serial.println(charBuf);
    system(charBuf);

    // Wait 10 seconds between each reading
    delay(10000);
}
Step 7: Launch your DIY weather station
Everything is ready to go.
Test your server from a PC on the same network, by opening a browser window with this address:
http://X.X.X.X:1337 (Exchange X.X.X.X with the IP of your Galileo)

Voila! Your Intel Galileo DIY weather station is working. Feel free to add more sensors and customize the output in whatever way you like it.
Copyright Build Electronic Circuits


