
Keyless piano using Arduino is sort of sequel to the DIY fun piano i have published in this website. In this project i have eliminated the need of buttons involved to play the piano. Here i have used IR in place of buttons. Let’s get into the construction and building part of this project.
PARTS REQUIRED:
- Arduino Uno – 1
- IR Sensor module – 4
- Buzzer/Speaker – 1
- Connecting wires.
USING IR SENSOR AS SWITCH:
The push buttons have been replaced by IR sensor module in this project. This module is capable of sensing any obstruction caused in its IR beam path. This obstruction forces the module to change the output voltage level in output. In our case fingers will be obstructing the IR beam which in turn will produce a voltage level change. As a result it acts same way as a button press. This way we can simulate the key press by obstructing the beam path. This article will guide you to build your own IR sensor module.
SETTING UP IR SWITCHES:
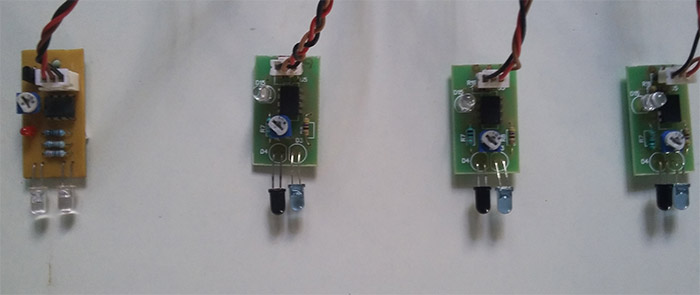
Set up your IR sensor modules as shown above for your keyless piano. Place the modules with equal space between them. This ensures other sensors will not get disturbed while obstructing a single beam. Stick every sensor module to the surface using a double-sided tape. Keep this setup in a place where external light is minimal, since it might disturb Photodiode used in it. The output from these modules will feed the pins A0 to A3 of Arduino.
SCHEMATIC DIAGRAM FOR KEYLESS PIANO:
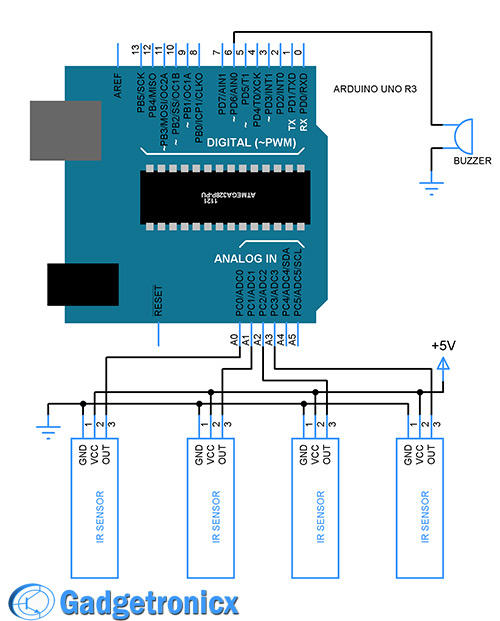
Schematic diagram is pretty straight forward. Four IR switches used to simulate the keypress as narrated above. Each of the sensor feeds logic level input to pins A0 to A3 of Arduino. Simple buzzer will act as our sounding element.
MUSIC NOTES:
Each notes in a piano will have certain frequency values. By creating those frequency signals using Arduino we can produce tones identical to the piano. Here is the list of note frequencies listed in Arduino official site. Also you will find notes on the use of tone() subroutine in that page.
ALGORITHM TO CODE:
- Define the frequency values for each tone.
- Declare A0 to A3 as input pins.
- Make pin 6 as output.
- Assign tones to each input pins.
- Run infinite loop to scan the pins A0 to A3 to detect high logic level input.
- Generate corresponding tone frequency in case any IR sensor is triggered.
CODE:
#define NOTE_C4  262                 //Defining tone frequencies
#define NOTE_G3  196
#define NOTE_B3  247
#define NOTE_A3  220
short int buzzer= 6;
int tone_freq[4]={NOTE_C4, NOTE_B3, NOTE_G3, NOTE_A3};
int duration[4]={250,250,125,250};

void setup() {
 pinMode(6,OUTPUT);                   //Declaring pin functions
 pinMode(A0, INPUT);
 pinMode(A1, INPUT);
 pinMode(A2, INPUT);
 pinMode(A3, INPUT);
}

void key_tones(int a)
{
  tone(6,tone_freq[a],duration[a]);   //Assigning tone for the each IR pairs
}

void loop() {                         //Scan for any obstruction
  if(digitalRead(A0)==HIGH)
  {
  while(digitalRead(A0)==HIGH);
  key_tones(0);
  }
  else if(digitalRead(A1)==HIGH)
  {
  while(digitalRead(A1)==HIGH);
  key_tones(1);
  }
  else if(digitalRead(A2)==HIGH)
  {
  while(digitalRead(A2)==HIGH);
  key_tones(2);
  }
  else if(digitalRead(A3)==HIGH)
  {
  while(digitalRead(A3)==HIGH)
  key_tones(3);
  }
}
WORKING VIDEO:
NOTE:
- You can increase the number of IR sensors used to increase tone possibilities.
- Keep the IR range minimal to prevent false triggering.
- The IR sensor i used have output voltage problem, so i have used an IC to shift the output voltage levels. I did this to help Arduino to sense voltage level better, please ignore it.
The post Keyless piano project using Arduino uno appeared first on Gadgetronicx.


