
Arduino based games and consoles are quite popular around the web. And this article is going to bring out the Design, working and code part of a simple Reflex test / trainer using Arduino Uno. Reflex tests are usually carried out to determine how quick our brain reacts to some external stimuli. Good Reflexes are very important for athletes, Sports personal and Gamers. Reflex test equipements or Reflex trainers usually consists of switches which needs to be activated within the time limit when the indicator goes on.
The above image shows the one i built using 4 push buttons and LED’s. This was a kind of mini version of Reflex test with limitations. However you can build complex huge one of your wish with replacing the buttons with big switches, increasing the distance between LED’s and altering the LED positions or patterns.
GAME BRIEF:
In the above Reflex gamer i have used simple push buttons as activator and LED’s as indicators. Each buttons are added near the each LED’s indicating the association between them. So when a LED lights up corresponding button should be pressed within the given time to score a point. The person who gets the most point wins the game, that’s how this game and design works.
REFLEX TEST USING ARDUINO DESIGN:
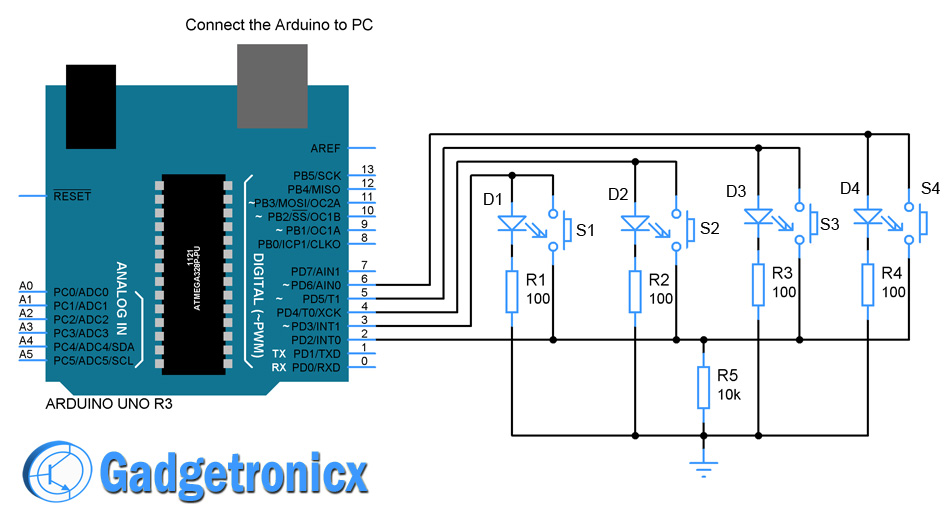
The design of this Reflex test/ trainer is pretty simple and easy to implement. The switches S1,S2…S4 acts as an activator for the LED’s D1,D2…D4. The switch and associated LED’s are connected in parallel manner. The other end of all the switches are tied together and connected to the pin 2 of Arduino where we are going to use the external interrupt of Arduino. Resistor R1,R2 … R4 serves as a current limiting resistor for LED meanwhile R5 acts as a pull down resistor for the interrupt pin 2 of Arduino.
WORKING OPERATION:
TEST SEQUENCE:
This sequence comprises turning the LED’s ON and OFF with specific time delay connected to the pins 3,4,5 & 6 pins of the Arduino. This time delay decides the difficulty level of your reflex test. When the LED’s are powered ON the high signal passes through the button since it was parallelly connected. Nothing happens interesting when button is in open state, but when it is closed it forms an electrical path to the pin 2 of Arduino. This triggers the interrupt in the Pin 2 and then the interrupt was processed as point in the code.
The interrupt will only be triggered if you are quick enough to press the button following the lighting sequence of the LED’s. Late button press or failing to hit the appropriate sequence will not result in interrupt. Therefore in turn there will be no points scored.
POINTS:
Every time you hit the right switch at the right time you will be awarded a point. Since i want to finish it by means of simple hardware i wrote the code to display the point in the serial terminal of Arduino IDE at the end of total sequence. This helps me to cut down the requirement of extra hardware for this project.
In case if you don’t wanna use your PC for viewing the points hook up a Bluetooth module to your Arduino. This enables your smart phone to communicate with your Arduino and get the points after test sequence is completed. You also can use a LCD with Arduino for points visibility, the choice is up to yours.
ALGORITHM TO CODE:
- Declare the pins 3,4,5 & 6 as output and set up pin 2 for external interrupt.
- Prepare a start routine to indicate the user that the test sequence is about to start, in my case i used the first LED to blink three times continuously to indicate the start.
- Declare the sequence in which the LED’s should light up and how many times a sequence should run in order to complete a single test.
- Set the sequence in such a way to make it challenging for the user the bigger the sequence tougher it is.
- Light up the LED’s in your desired sequence with time delays between ON and OFF time, make the time delay challenging.
- Lesser the time delay the more challenging it is.
- Write down a sub routine to increment the points when an interrupt is encountered.
- Print the points once the whole sequence is completed.
WORKING VIDEO:
CODE:
int sequence[15]={4,6,3,5,3,5,6,4,5,3,4,5,6,4,3};   //Array to set the blink sequence
short int i,point;

void setup() {
Serial.begin(9600);
pinMode(3, OUTPUT);
pinMode(4, OUTPUT);
pinMode(5, OUTPUT);
pinMode(6, OUTPUT);
pinMode(13,OUTPUT);
pinMode(2, INPUT);
attachInterrupt(digitalPinToInterrupt(2), point_count, RISING);      //Setting the external interrupt on pin 2 raising edge
}

void start_routine()                                      //Three blink routine to indicate the start of the game
{
 for(i=0;i<=2;i++)
 {
  digitalWrite(3,HIGH);
  delay(500);
  digitalWrite(3,LOW);
  delay(500);
 }
 Serial.println("GO");
}

void loop() {
short int j;
start_routine();                 //Calling game start routine
for(j=0;j<=1;j++)                //Repeating game sequence twice for a total of 30 points
{
  for(i=0;i<=14;i++)                       //Starting game sequence
  {
    digitalWrite(sequence[i],HIGH);
    delay(700);
    digitalWrite(sequence[i],LOW);
    delay(100);
  }
}
  Serial.println(point);          //Printing score in the serial monitor at the end of game
  while(1);
}

void point_count()              //Couting point when interrupt encounters
{
 digitalWrite(sequence[i],LOW);
 point=point+1;
}
NOTE:
- As i mentioned above the one i built was more like a prototype with some limitations. However you can build a huge one by replacing the switches and increasing the distance between switches and modifying its arrangement.
- Remember the time delay and the sequence plays a crucial factor in setting the complex level of this game.
The post Reflex test for your brain using Arduino appeared first on Gadgetronicx.


