
Shield’s electrical diagram
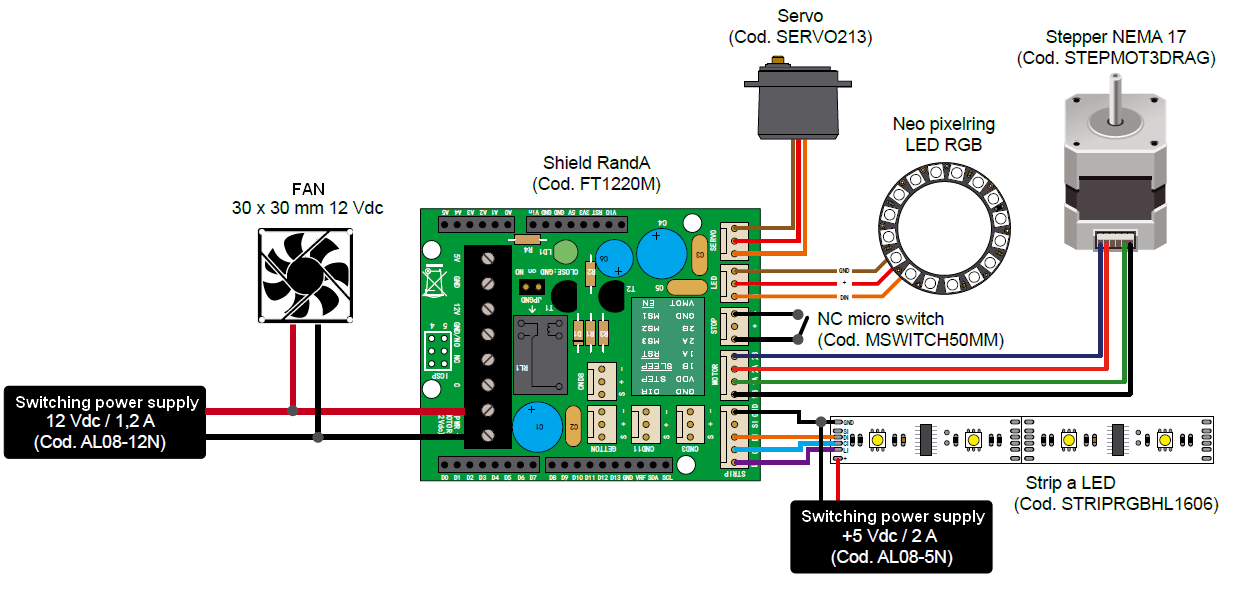
The shield carries all the connections to the machine and receives the power supply for the motor and the LED ring. The fan is mounted on the plastic container.
The circuit that interfaces RandA with the machine’s mechanics is contained in a shield on which the motor driver is mounted (for its description we refer the reader to the dedicated diagram in these pages). The shield hosts the basic connectors for the application, such as the one to connect the limit switch (STOP contacts), the LED strip (STRIP contacts), the servo control (SERVO) and a possible contact with which to subordinate the order (for example, it is applied at the output of an electromechanical token dispenser, with free contact normally open) whose connector is signed GETTON. The auxiliary connectors (CND3, CND8 e CND11, which have been reserved to possible developments: if you feel like doing it, you can do by yourself) have been prepared. The LED connector is there as well, to light the decorative LEDs to be arranged under the glass housing, so to create a play of the light. The limit switch can be NC or NO, connected between S and the positive or between S and the ground, but in our application it is NC, connected between S and ground. For this purpose, the RandA firmware sets up the internal pull-up resistor for the corresponding line (Arduino’s A3), so that when the switch is idle and closed, RandA’s ATmega receives the logical zero, while when the idle position is reached, A3 is at logical 1. The choice to use a NC switch has been imposed by the fact that the machine stops the cart and the sequence by opening it, thus if a wire is cut or detached, we are certain that the machine will stop.

A servo-control, by the lever in the figure, pushing the button from the bottom of the dispenser.
The token dispenser’s input is interfaced with RandA by means of the NPN T1 transistor, whose collector ends on the D13 line, for which it is appropriate to activate the internal pull-up; the “hot” conductor is S, while the contact can be connected between it and GND (-) o +.
On the board a relay is also taken into account, to be used for various functions (for example, to turn on a flashing light or an acoustic warning when the bottle is empty), of which the whole exchange is made available, and whose central contact can be connected internally to ground, by means of the JPGND bridge. The relay is commanded by the NPN T1 transistor, which in turn is polarized, depending on RandA’s D12 line. A diode in parallel to the RL1 reel is needed to stop reverse voltages that it will generate as a reaction at each T1 interdiction, and that may damage the collector/basis junction of the transistor itself.
As regards the connection to the STRIP, it is a sort of SPI bus: the CI line is the serial communication’s clock, DI is the output data channel from RandA and the input one for the strip, SI is not used (that can be avoided) and LI is the strobe signal for the latch which is an input to the HL1606. The communication protocol with the strip considers the bits, sent in sequence, that enable to set lighting and colour for each LED. The controller addresses up to 6 channels with a power of 30 mA each, and is capable of a colour resolution of 6+1 levels. The HL1606 chips include, within the controls set, the “automatic hue” modes for a timed and synchronized transition with some predetermined sequences, from black to a primary colour, from a primary colour to another one, or rainbow-like. In the strip, the serial control is of the essential, since otherwise to individually manage the single LEDs that compose it, many lines would be needed, even if using a multiplex matrix command. By adopting chip controllers such as HL1606, the interface is simplified to the point of counting just three lines plus the power supply (actually, it is four plus the 5 V, but we succeed at managing the controller with just three).


